Jadwal Siaran Langsung Fase Grup Piala Dunia 2014

Berikut jadwal lengkap pertandingan-pertandingan fase grup yang akan disiarkan langsung tvOne dan antv:

Grup A
13 Juni: 03.00 – Brasil vs Kroasia
13 Juni: 23.00 – Meksiko vs Kamerun
18 Juni: 02.00 – Brasil vs Kamerun
19 Juni: 05.00 – Kamerun vs Kroasia
24 Juni: 03.00 – Kamerun vs Brasil
24 Juni: 03.00 – Kroasia vs Meksiko

Grup B
14 Juni: 03.00 – Spanyol vs Belanda
14 Juni: 05.00 – Chile vs Australia
18 Juni: 23.00 – Australia vs Belanda
19 Juni: 02.00 – Spanyol vs Chile
23 Juni: 23.00 – Australia vs Spanyol
23 Juni: 23.00 – Belanda vs Chile

Grup C
14 Juni: 23.00 – Kolombia vs Yunani
15 Juni: 08.00 – Pantai Gading vs Jepang
19 Juni: 23.00 – Kolombia vs Pantai Gading
20 Juni: 05.00 – Jepang vs Yunani
25 Juni: 03.00 – Jepang vs Kolombia
25 Juni: 03.00 – Yunani vs Pantai Gading

Grup D
15 Juni: 02.00 – Uruguay vs Kosta Rika
15 Juni: 05.00 – Inggris vs Italia
20 Juni: 02.00 – Uruguay vs Inggris
20 Juni: 23.00 – Italia vs Kosta rika
24 Juni: 23.00 – Italia vs Uruguay
24 Juni: 23.00 – Kosta Rika vs Inggris

Grup E
15 Juni: 23.00 – Swiss vs Ekuador
16 Juni: 02.00 – Prancis vs Honduras
21 Juni: 02.00 – Swiss vs Prancis
21 Juni: 05.00 – Honduras vs Ekuador
26 Juni: 03.00 – Honduras vs Swiss
26 Juni: 03.00 – Ekuador vs Prancis

Grup F
16 Juni: 05.00 – Argentina vs Bosnia
17 Juni: 02.00 – Iran vs Nigeria
21 Juni: 23.00 – Argentina vs Iran
22 Juni: 05.00 – Nigeria vs Bosnia
25 Juni: 23.00 – Nigeria vs Argentina
25 Juni: 23.00 – Bosnia vs Iran

Grup G
16 Juni: 23.00 – Jerman vs Portugal
17 Juni: 05.00 – Ghana vs Amerika Serikat
22 Juni: 02.00 – Jerman vs Ghana
23 Juni: 05.00 – Amerika Serikat vs Portugal
26 Juni: 23.00 – Amerika Serikat vs Jerman
26 Juni: 23.00 – Portugal vs Ghana

Grup H
17 Juni: 23.00 – Belgia vs Aljazair
18 Juni: 05.00 – Rusia vs Korea Selatan
22 Juni: 23.00 – Belgia vs Rusia
23 Juni: 03.00 – Korea Selatan vs Aljazair
27 Juni: 03.00 – Korea Selatan vs Belgia
27 Juni: 03.00 – Aljazair Rusia

Dynamic DNS Update On MIKROTIK

In order to update DDNS (Dynamic DNS) on MikroTik router or RouterOS device, we have to make use of the scripting and scheduler feature.


In this guide, we can only select one of them to show you here. We selected dynDNS for an example here.

Thanks for the community, we have a ready script for dynDNS at http://wiki.mikrotik.com/wiki/Dynamic_DNS_Update_Script_for_dynDNS, so we copied the script from there.

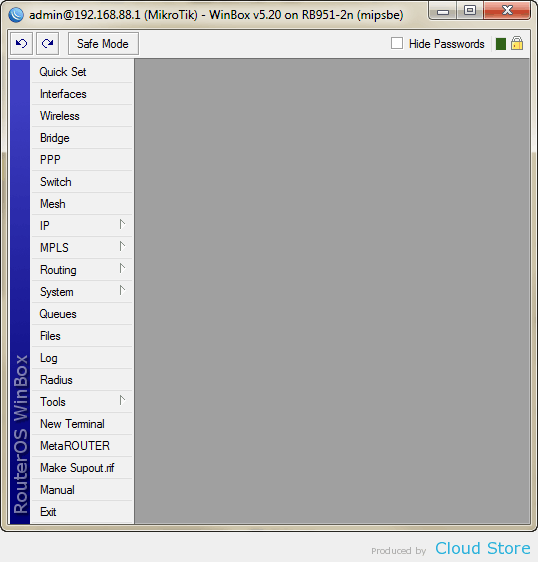
Run WinBox.

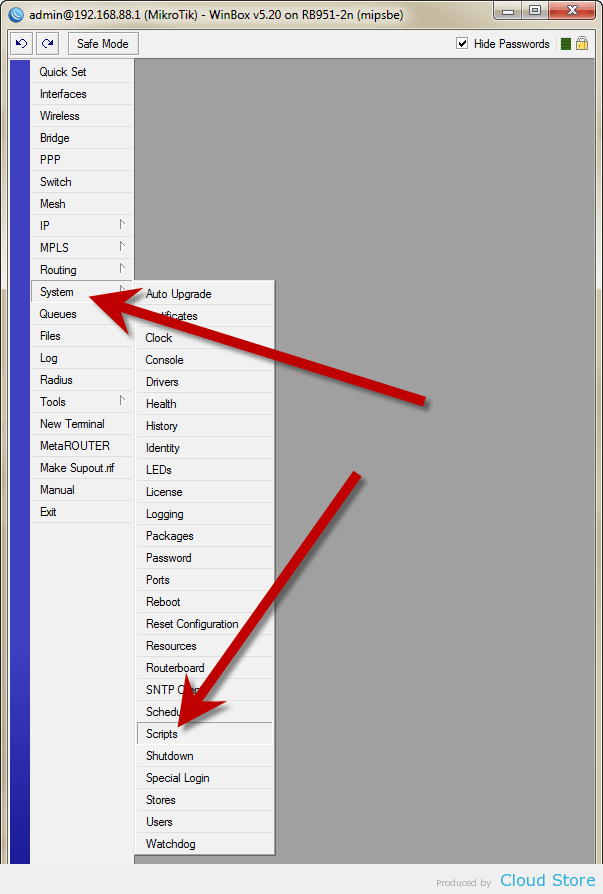
Click “System” then “Scripts”.

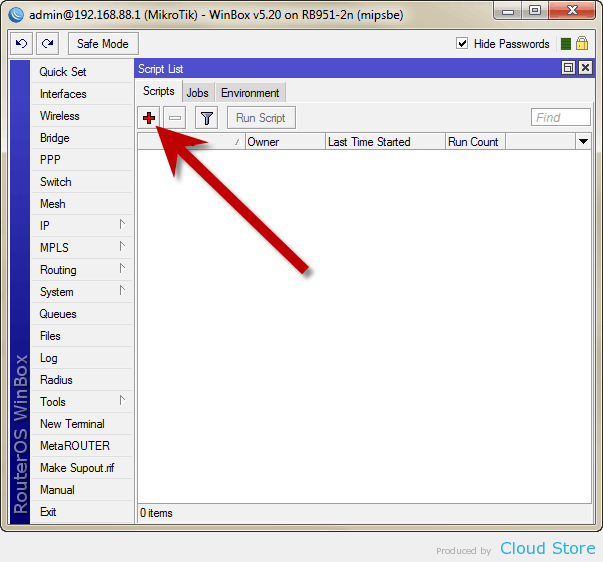
Press the plus button.

Change the name to “dyndns” and paste the full script with your account details into the textarea. Press “OK” to complete.

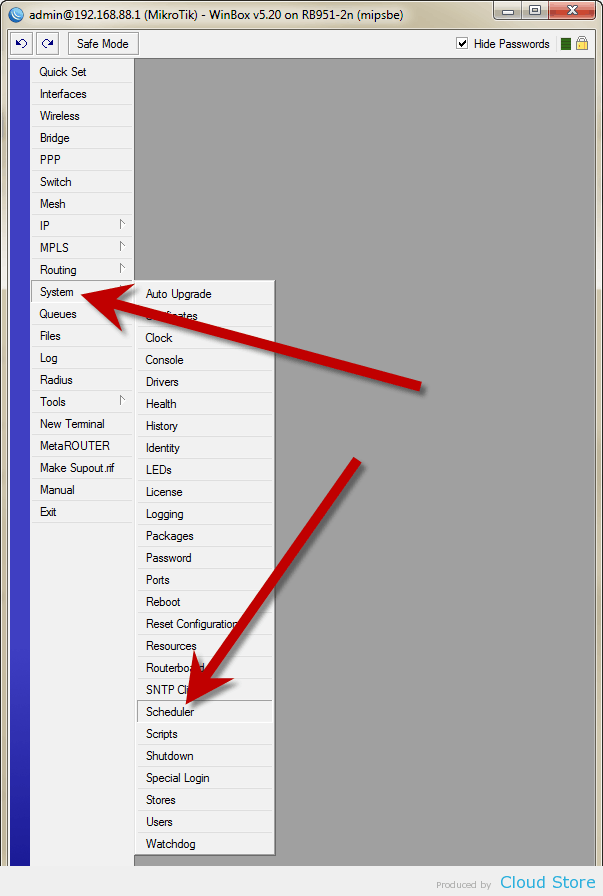
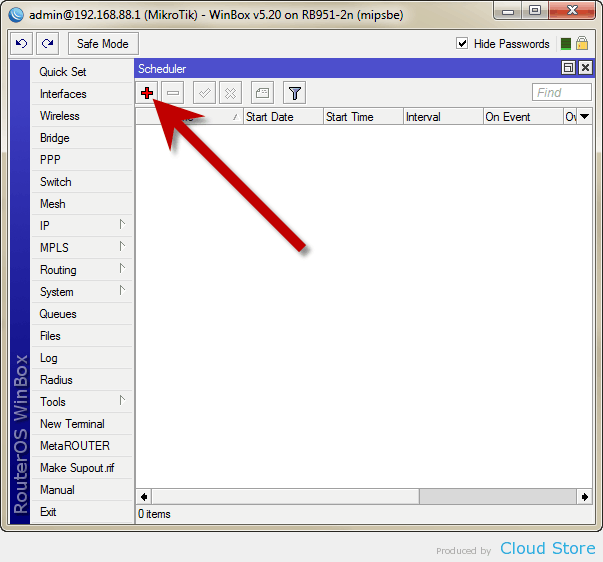
Click “System” on the menu then “Scheduler” on the sub-menu.

Press the plus button.

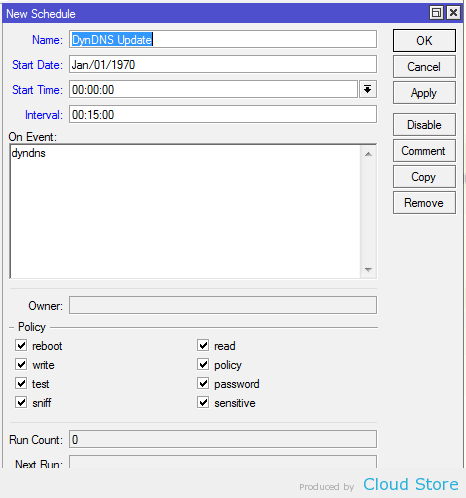
Change the values as below and write the name of the script in “On Events:’. Interval is the time before the script is ran again. The value here stated 15 minutes, so the router will check and update the DDNS every 15 minutes.

Press “OK” to complete. The update will run a

Enabling More than One Remote Desktop Session on Windows XP SP3

As you probably all know by now, Windows XP Professional allows you to only use one concurrent Remote Desktop session. The moment the remote user connects to the workstation by using Remote Desktop, the locally logged-on user is locked out of the computer, and the remote user, if he or she are using the same credentials as the user which is currently logged-on, see the same desktop as the current user saw right before he or she were locked out. If the remote user is using different credentials than the user which is currently logged-on, then they must be members of the administrators local group in order to log-off the current user, and create a new user session.

sponsored

Can you playback remote sessions?

Record RDP, SSH, VMware & Citrix Sessions. Watch what remote vendors & privileged users do on your network. Comes with easy-to-read transcription of each session – you don’t have to watch each video to know what happens.

Download ObserveIT Free!

All this is well and fine, but the problem is that sometimes one might want to have more than one concurrent Remote Desktop session.

Luckily for us, ever since the first days of Windows XP, there were people who managed to get around this limitation by editing a file on the XP machine, and making some registry changes. When Windows XP SP2 came out, the patched file got overwritten by the new version of the file, and so was the case in Windows XP SP3.

Now, there’s a new version of the patched file available for you to use. Actually, this is not really a news item, it’s just something I came across and decided to write about because I recently got some questions about this issue from a couple of readers.

However, be warned. Before you begin, I need to warn you that patching the file and allowing more than one concurrent Remote Desktop session will violate a few lines in the Windows XP EULA. Proceed with caution and at your own risk. I shall not be liable for any damage caused to you, your computer, your data or your dog/cat because of this.

First, download the patched file, registry file and instructions.

The patched file is termsrv.dll version 5.1.2600.5512 which was updated when installing Windows XP Sp3.

Download link:

http://www.isralet.com/files/termsrv_sp3_patch.rar

(Ping me if link gets broken, I’ll see if I can find a different working link)

Next, read and follow the simple the instructions.

Installation instructions (provided in the readme file):

1. Go to C:\Windows\system32\dllcache and rename the termsrv.dll to termsrv.dll.bak.

patch-remsrv-dll-1

2. Go to \Windows\System32 folder and rename termsrv.dll to termsrv.dll.bak.

3. Copy the new SP3 patched termsrv.dll to \Windows\System32 folder.

patch-remsrv-dll-2


  1. Print these directions so that you have them to work from.
  2. Restart your computer in Safe Mode – Follow this link to learn how to restart Windows XP in Safe Mode
  3. Turn off/disable Remote Desktop Connection (RDC) and Terminal Services
  4. Right click My Computer
  5. Select Properties
  6. Click on the Remote tab at the top of the window
  7. UNCHECK the box next to, “Allow users to connect remotely to this computer
  8. Click OK
  9. Go to Start -> Control Panel -> Administrative Tools -> Services
  10. Find Terminal Services in the list
  11. Right click on Terminal Services and click Properties
  12. In the Startup Type box, select Disabled

10. Click OK to close the window

  • Next you will replace the current version of the Terminal Services DLL (termsrv.dll) with an unrestricted version from a previous release of Terminal Services.
  1. Here is a copy of the (NOTICE: I have removed the link to this file as the one I had was reported as carrying a trojan…try googling it) – Save it to your Desktop or other suitable location
  2. Using a file manager like Windows Explorer open C:\Windows\system32\dllcache
  3. Rename the file termsrv.dll to termsrv_dll.bak or whatever you would like.
  4. Copy the downloaded termsrv.dll file (the one you just downloaded from the web) to C:\Windows\system32\dllcache
  5. Open the C:\Windows\system32 folder
  6. Delete the file termsrv.dll in C:\Windows\system32 (paste new file)
  • Now we can edit the Windows Registry to enable more than one RDP connection. Go to Start -> Run and type regedit – Hopefully you knew that already
  • Go to HKEY_LOCAL_MACHINE\SYSTEM\CurrentControlSet\Control\Terminal Server\Licensing Core
  • Add a DWORD Key named EnableConcurrentSessions and give it a value of 1
  • Close the Registry Editor window
  • Go to Start -> Run and type gpedit.msc to run the Group Policy Editor
  • Browse to Computer Configuration -> Administrative Templates -> Windows Components -> Terminal Services and double click Limit number of connections
  • Select the Enabled button and enter the number of connections you would like to enable….at least 2.
  • Restart Windows
  • Right click My Computer and select Properties.
  • Click on the Remote tab at the top of the window
  • CHECK the box next to, “Allow users to connect remotely to this computer
  • Click OK
  • Go to Start -> Control Panel ->Administrative Tools -> Services. Select Terminal Services from the list and double click it or right-click -> Properties. Set the Startup Type to Manual.
  • Restart Windows/Computer


Extending an LVM volume: Physical volumes (partitions) -> Volume groups -> Logical volume -> Filesystem

In LVM, there are several layers, each builds on top of the other:

PV[s] (Physical Volumes) -> VG[s] (Volume Groups) -> LV[s] (Logical Volumes) -> Filesystems.

Logical Volumes are allocated/extended within the boundaries of their underlying storage pool which is called a Volume Group in LVM terminology.

For example, in TurnKey the filesystem is installed by default to the /dev/turnkey/root Logical Volume, which is allocated within the turnkey Volume Group:

--- Logical volume ---
  LV Name                /dev/turnkey/root
  VG Name                turnkey
  LV UUID                OzX3fe-aRQa-81XM-0vCV-8aJo-eUL4-6J90XJ
  LV Write Access        read/write
  LV Status              available
  # open                 1
  LV Size                17.0 GiB
  Current LE             4502
  Segments               2
  Allocation             inherit
  Read ahead sectors     auto
  - currently set to     256
  Block device           251:0

Out of the box the turnkey Volume Group doesn’t have too much free space:

# vgdisplay
  --- Volume group ---
  VG Name               turnkey
  System ID
  Format                lvm2
  Metadata Areas        1
  Metadata Sequence No  3
  VG Access             read/write
  VG Status             resizable
  MAX LV                0
  Cur LV                2
  Open LV               2
  Max PV                0
  Cur PV                1
  Act PV                1
  VG Size               18.14 GiB
  PE Size               4.00 MiB
  Total PE              4645
  Alloc PE / Size       4480 / 17.50 GiB
  Free  PE / Size       165 / 660.00 MiB
  VG UUID               IwaFL0-QCi8-iIUE-TWjQ-R906-PYpH-gMPaH9

We can only extend a Logical Volume within the free space of the underlying Volume Group. How much free space we currently have within the Volume Group can be seen in this part of the output:

Free  PE / Size       165 / 660.00 MiB

In the above example we only have 660 MB to allocate to LVMs within the turnkey Volume Group. So if we want to extend the root LV we’ll have to first extend the VG backs it up.

Volume Groups group together Physical Volumes. That’s why they’re called Volume Groups. This command will show us which Physical Volumes have been registered into LVM, and to which volume groups they have been assigned:

# pvdisplay
  --- Physical volume ---
  PV Name               /dev/sda2
  VG Name               turnkey
  PV Size               18.15 GiB / not usable 4.00 MiB
  Allocatable           yes
  PE Size               4.00 MiB
  Total PE              4645
  Free PE               165
  Allocated PE          4480
  PV UUID               H1Prpv-0VXR-7moE-zsbt-eyVt-m0fQ-GkAT6w

In this example we only have one Physical Volume (the /dev/sda2 partition) in the turnkey Volume Group.

Extending a Logical Volume

Bottom line: if the underlying Volume Group doesn’t have enough free space, to extend the Logical Volumeyou’ll first have to extend the underlying Volume Group by adding another Physical Volume to it.

In VMWare you could either create a new virtual hard disk device to add to the volume group, or extend an existing virtual hard disk device, create a new partition with cfdisk, and add the new partition to theVolume Group:

# example #1: you've added to VMWare a new virtual hard disk called /dev/sdb
pvcreate /dev/sdb
vgextend turnkey /dev/sdb

# example #2: you've expanded the existing sda hard disk
cfdisk /dev/sda  # creating /dev/sda3 (you may need to reboot before you can see this)
pvcreate /dev/sda3
vgextend turnkey /dev/sda3

After you’ve extended the Volume Group, you are free to extend the underlying Logical Volume:

# lvextend -L+10G /dev/turnkey/root
Extending logical volume root to 27.0 GiB
Logical volume root successfully resized

Finally, you’ll have to resize the filesystem within /dev/turnkey/root so it can see that the underlying block device just got 10G bigger:

# resize2fs /dev/turnkey/root
resize2fs 1.41.11 (14-Mar-2010)
Filesystem at /dev/turnkey/root is mounted on /; on-line resizing required
old desc_blocks = 2, new_desc_blocks = 2
Performing an on-line resize of /dev/turnkey/root to  7077888 (4k) blocks.
The filesystem on /dev/turnkey/root is now 7077888 blocks long.

HOW TO RESIZE A VIRTUALBOX 4+ HARD DISK *.VDI

VirtualBox 4.0 got a very cool new feature that allows you to easily resize a hard disk in just a few seconds. Previously, you had to install Gparted to do this and the procedure was quite slow.

In VirtualBox 4.0+ (see how to install VirtualBox 4.0.x in Ubuntu), to resize a VirtualBox hard disk image (.VDI) firstly locate the folder where the .vdi you want to resize is located – this should be under ~/VirtualBox VMs or ~/.VirtualBox/HardDisks. Then open a terminal, navigate to that folder (“cd /FOLDER/PATH”) and run the following command to resize the .VDI:
VBoxManage modifyhd YOUR_HARD_DISK.vdi --resize SIZE_IN_MB
Where YOUR_HARD_DISK.vdi is the VirtualBox hard disk you want to resize and SIZE_IN_MB is the new virtual hard disk size, in megabytes. For example, the following command will resize the VirtualBox hard disk called “natty.vdi” to 12000 megabytes:
VBoxManage modifyhd natty.vdi --resize 12000
That’s it! The process takes just a few seconds and you should now have a resized VirtualBox hard disk.

How To Remove GUI (GDM, Gnome, X Window) from CentOS

If you planned to install a CentOS server, but mistakenly also installed Desktop Environment such as GNOME, you can easily remove the GUI packages and return back to Command Line (CLI).

There are two ways to do that. You can simply disable GUI or completely uninstall it. I will provide steps to do both.

Disable GUI (GDM)

nano /etc/inittab

change id:5:initdefault: to id:3:initdefault:

Remove GUI

If you want to remove all GUI packages completely, please still use the disable GUI steps first otherwise once Gnome, GDM, X Windows removed CentOS will still try to load X Window.

To remove GUI packages follow the steps:

yum groupremove "GNOME Desktop Environment" -y
yum groupremove "X Window System" -y

If you want to temporarily stop GDM (GUI), you can issue this command:

init 3

and then back to start GDM:

init 5

Print spooler keeps stopping on Windows 7

I have an HP desktop computer running Windows 7 it has an HP photosmart Printer and an Kodak AIO 5500 attached to it and shared over the network. Everything is fine with the HP printer but every time I try to print to the Kodak the print spooler keeps stopping. I have tried many of the work arounds I have found but nothing helps. Every time I try to print to the KOdak I have to wait until after I have made all the print option and then I have to start the spooler.  The firmware and software is up to date on the Kodak printer.  How can I fix this?

Answer :

Hi,


I would like to suggest you perform the following steps to troubleshoot the issue.


Clear Printer Spooler Files and Enable the Spooler Service

=================================

1. Click Start, type “Services.msc” (without the quotation marks) in the Search box and press Enter.

2. Double-click “Printer Spooler” in the Services list.

3. Click Stop and click OK.

4. Click Start, type “%WINDIR%\system32\spool\printers” in the Start Search box and press Enter, delete all files in this folder.

5. Click Start, type “Services.msc” (without the quotation marks) in the Start Search box and press Enter.

6. Double-click “Printer Spooler” in the Services list.

7. Click on Start. In the Startup Type list, make sure that “Automatic” is selected and click OK.


Does it work?


Answer :

Check for the spooler whether it’s turn on in services

1.       Start > Start Search > services.msc

2.       If spooler is not on, turn it on. If after turn on, it turn off automatically, proceed to step 3, if can turn on go to step 4

3.       Start > Start Search > C:\Windows\System32\spoolsv.exe (Right click > Properties)

4.       Click on Security Tab > Advanced > Owner. Take ownership of the file and give full permission to the file. Once done, close everything and try to start the service again.

5.       Start > Start Search > cmd (Run as Admin)

6.       del /Q C:\WINDOWS\system32\spool\PRINTERS\*.* > Press Enter

7.       Once done, try to start the spooler in Services

Thank you


Change the Timezone in Linux

How to Change the Timezone in Linux

Using the Graphical User InterfaceUsing the Timezone Selection MenuUsing the Command Line

Whether you’re a new user or a seasoned terminal expert, you can easily change the timezone of your Linux computer. There are three main ways to change the timezone settings in Linux; one uses the desktop and the other two are executed through the command line. Follow this guide to learn all of them.

EditMethod 1 of 3: Using the Graphical User Interface

  1. Click on the System menu and select Administration. Select the Time and Date option.
    • Alternatively, you can click on the clock and select Time and Date settings from the menu.
    • This method is for Ubuntu. The menu options are similar for most Linux distributions.[1]

  2. Click your currently selected timezone. Depending on your distribution, you may have to select a timezone tab first.
  3. Select your location on the world map. Most everyu distribution will have a graphic map that you can use to select your location. This will help narrow down the correct timezone for you.
    • After selecting your general location, select the closest city.

EditMethod 2 of 3: Using the Timezone Selection Menu

  1. Open the terminal. This method will open an ASCII menu that will allow you to choose your timezone. Enter the following command based on the Linux distribution you are using:
    • Ubuntu: dpkg-reconfigure tzdata
    • Redhat: redhat-config-date
    • CentOS/Fedora: system-config-date
    • FreeBSD/Slackware: tzselect
  2. Select your timezone. Each distribution will open a slightly different menu, but all generally perform the same function. Navigate to the region and city that best matches your location and select it. This will change the timezone on your system.[2]

EditMethod 3 of 3: Using the Command Line

  1. Check your current timezone. Log in as root. Open the terminal and check which timezone your machine is currently using by executing the date command. The terminal will display the date in the following format: Mon Aug 12 12:15:08 PST 2013. PST in this case refers to the current timezone (Pacific Standard Time).
  2. Select your timezone region. Change to the directory /usr/share/zoneinfo. A list of time zone regions will be displayed. Choose the most appropriate region by pressing the corresponding number.
    • The /usr/share/zoneinfo directory may vary depending on your Linux distribution.
  3. Backup your old timezone settings. If you wish, backup the previous timezone configuration by renaming it to a backup name. Use the following command mv /etc/localtime /etc/localtime-old
  4. Link your machine’s clock to a city in your timezone. Use the following command, replacing the region and city with your appropriate entries: ln -sf /usr/share/zoneinfo/Europe/Amsterdam /etc/localtime [3]
    • If your city is not listed in the timezone list, pick one from your same timezone.
  5. Verify that your timezone has been set. Run the date command again and check that the timezone corresponds to the one you just changed to.
  6. Set your clock to stay synced with internet time servers. Most modern distributions have NTP already installed. If you do not, you will need to install the NTP server package. Use the following commands to install it, depending on your Linux distribution:
    • Ubuntu/Debian: sudo aptitude install ntp
    • CentOS: sudo yum install ntp
      sudo /sbin/chkconfig ntpd on
    • Fedora/RedHat: sudo yum install ntp
      sudo chkconfig ntpd on
    • Enter the ntpdate command: ntpdate <time server> && hwclock –w
    • There are a variety of public time servers available to connect to. You can find listings online.[4]

Download BBM For Android : Bocor….??

BlackBerry memang belum resmi merilis BlackBerry Messenger untuk Android, meski begitu sebagian para pengguna ‘si robot hijau’ sudah bisa menginstal aplikasi tersebut.

BBM untuk Android memang belum bisa didapat di Google Play Store, melainkan beredar melalui forum-forum online seperti xda developer ataucrackberry. Banyak anggota yang sudah mencicipi tersebut.

Pasalnya, tak semua orang diberikan izin oleh BlackBerry untuk menggunakan aplikasi tersebut, melainkan hanya segelintir orang yang sebagian besar adalah karyawan perusahaan asal Kanada itu.

Pun begitu, berkat bocoran ini paling tidak tergambar seperti apa bentuk BBM untuk Android nanti, mulai dari interface hingga fitur-fitur yang ditawarkan.

BBM untuk Android rencananya akan dirilis BlackBerry pada 20 September 2013. Tapi perlu dicatat, tidak semua perangkat Android bisa menggunakan BBM. Dalam percobaan inikita gunakan  dengan sistem operasi Android Jelly Bean.

 Sumber : detik

Download BBM for Android